
If you’ve ever dreamt of strolling on the cobblestone streets leading to the Colosseum in Italy or jumping into the crystal clear waters of Mallorca, there is only one thing standing between you and all your European dreams: a Schengen Visa.
Applying for a Schengen Visa is one of the most nerve-wracking and tedious processes and you can never be sure whether you will get the visa or not, even after spending endless hours and money.
We’ve been through it enough times to tell you – we have got your back! From booking your visa appointments to writing a killer cover letter, this blog is one-stop source for all your Schengen visa related queries.
What you’ll find in this guide
- The Basics of a Schengen Visa
- Visa Appointment Tips
- Step-by-Step Guide
- Document Checklist
- How to Write a Cover Letter
- Format of our Cover Letters
- Supporting Documents


Basics of a Schengen Visa
A Schengen Visa allows Indian passport holders to visit 27 European countries with just one visa. A valid Schengen Visa also lets you enter a couple of countries on visa-on-arrival or visa-free basis.
🗓️ Best time to Apply
The best time to apply for a Schengen Visa is 7-8 weeks before travel. Although the processing time may not exceed 10-14 days for most embassies, an early visa acceptance helps plan the holiday better and score stays better aligned with your budget.
You can apply up to 6 months in advance, but please note that visa slots are sparse and limited for the peak travel season, i.e. May-July.
Visa Appointment Tips
One of the most crucial steps to successfully secure a Schengen Visa is to choose the right country to apply for the visa. Not all Schengen countries have the same visa rejection rates or appointment availability.
🌍 Countries with lower rejection rates:
- Switzerland 🇨🇭
- Spain 🇪🇸
- France 🇫🇷
- Iceland 🇮🇸
- Poland 🇵🇱
- Finland 🇫🇮
- Italy 🇮🇹
- Greece 🇬🇷
- Lithuania 🇱🇹
⚠️ Important: Always apply through the country where you’ll spend the most number of nights. In case your stay is equally split in two or more countries, apply through the first point of entry. We highly discourage going visa shopping on a whim.

Step-by-Step Guide
Once you’ve selected the country to apply for the Schengen Visa, these are the steps that you’ll need to follow:
Step 1: Search the country-specific application process
Each country within the Schengen zone has its own set of requirements. To get started, simply Google:
“(Country Name) VFS India”
For example: This year, we applied for our Schengen Visa through Spain, and their visa process is managed by BLS International (not VFS). So we searched:
“Spain BLS India” – and it took us to the official BLS page with step-by-step guidance, document checklist, and appointment booking details.
Step 2: Choose the Visa Category Based on Your Trip
Once you’re on the VFS or BLS page, you’ll need to select the correct type of visa. This should be based on your travel intent and duration.
✈️ For most tourists and first-time applicants:
- Select “Short-Term Visa (Type C)”.
- Then choose “Tourism” as the purpose of visit.
- This allows you to stay in the Schengen area for up to 90 days within a 180-day period.
🧳 If you’re applying for a longer stay:
- Look for Long-Term Visa (Type D) categories.
- These are generally used for study, work, research, or family visit, and sometimes for long-stay tourism or digital nomad stays in countries like France or Portugal (if applicable).
- These visas require a different set of documents, and the process may include an interview or local registration.
✅ Note: Most tourist visa applications fall under the Short-Term category, especially for first-time Schengen applicants.
Step 3: Book your Visa Appointment
This is the second most crucial step of your visa application. You need to book your appointment slots early as they tend to fill up fast, especially before peak travel season. A visa appointment is the official and final submission of your documents for the Schengen visa and it is where you give your biometrics.
You can book a slot up to 6 months before your travel date.
Next steps:
- Find the nearest VFS centre in your city (Delhi, Mumbai, Chennai, Bengaluru).
- Select your preferred date and time.
- Always print your appointment confirmation as you won’t be let inside the visa centre without a physical copy.
Step 4: Fill out the Visa Application
Your visa form acts as your official introduction to the consulate and all information must be filled carefully and truthfully.
- Select “Multiple Entry” if your itinerary involves entering and exiting the Schengen zone multiple times.
- Avoid typos or inconsistencies/
- If you’ve faced a visa rejection before, mention it honestly and attach the rejection letter if required.
Step 5: Prepare your Documents for the Application
Carefully collect all the necessary documents aligned with the country specific requirements. Each country clearly mentions a checklist on their website to help the applicants prepare their documents folder.
Document Checklist
Before your appointment, ensure you have all the necessary documents. Here’s the complete checklist for your reference:
General Documents
| 🛂 Passport | Original passport with at least 6 months validity. All previous passports attached with a rubber-band. |
| 📄 Copy of passport pages | A copy of the front page and the back page of your passport. |
| 🖼️ Photographs | 3 passport-size photos (35mm x 40mm, matte white background, recent) |
| ✍️ Application Form | Duly filled and signed visa application form. |
| 📝 Appointment Letter | Printed appointment confirmation letter. |
| 📄 Previous Visa Copies | Attach copies of previous or valid sticker visa (especially US, UK, Canada). |
| ✉️ Cover Letter | It must include all information like purpose of your trip, details, financial history, and strong ties to your home country. |
| 🏡 Address Proof | If you apply from a different city as mentioned in your passport, you must provide address proof, e.g., rental agreement, electricity bill, or a letter from your bank/employer. |
Financial Documents
| 📄 Income Tax Return | ITR acknowledgement of the last 3 years to show financial stability. Recommended ITR should be more than 12-15 Lakh income. If business-owner, attach company’s ITR of the last 6 assessment years. For funded individuals/students/dependents, attach ITR of parents/sponsor – acknowledgement of the last 2 years. |
| 🏦 3 Months Bank Statement | Bank statements of all savings account for 3 months duly signed and stamped. If business-owner, attach 6 months bank statements of the company accounts. |
| 💰 Salary Slips | Last 3 months salary slips OR invoices if self-employed. |
| 📊 Investment Proofs (optional but useful) | Mutual funds, FD, property ownership, shares, etc. |
| 🗂️ NOC | For salaried applicants, a No Objection Certificate is required signed by the HR/Manager stating your approved leaves. |
| 🧑💼 Business-ownership proof | Attach Company registration, GST certificated, or partnership deed if you’re a business-owner. |
| 🧾 Sponsorship Letter | In case you are invited by friends and family, attach a signed agreement letter supporting your stay. For students/dependents, attach a confirmation of financial support – a sponsorship letter that includes detailed information about the financial support and proof of funds. |
Travel Documents
| 🗺️ Itinerary | Attach a simple, realistic day-wise travel plan for the trip. Avoid over-explaining your itinerary. It should be an overview of your trip with countries, cities, and dates. |
| 🏨 Hotel Bookings | Confirmed hotel bookings for each destination that you intend to visit and stay. Only make refundable hotel bookings, via booking.com |
| 🛫 Return Flight Bookings | Attach confirmed round-trip flight tickets. ⚠️ Only attach dummy flight tickets. Use dummy-tickets.com to book yours. Book exactly a day before your appointment as the tickets are valid for 3 days after booking. |
| 🛡️ Travel Insurance | The application must contain valid travel insurance with coverage up to 50,000 Euros, valid across all Schengen countries. It should also cover the entire duration of the trip. We always get Digit Insurance. |


How to Write a Cover Letter
Your cover letter for the Schengen Visa application is arguably the most important document. Consider it as your personal pitch to the consulate to issue you the visa. This is your space to explain why you’re excited to travel to Europe, where you’re going, and why should they trust you’ll return home.
💡 Write it yourself
Take inspiration from templates online, but don’t copy-paste. This letter should sound like you, not a robot. Avoid involving an agent to write the cover letter for you. We have heard horror-stories of people getting their visa rejected because of an agent.
🛫 Clearly explain why you’re travelling
Whether it’s a solo backpacking trip, a honeymoon, or a family holiday, you must mention the purpose upfront.
🗺️ Mention your travel plan
You don’t need to list out your entire day-by-day itinerary, but you should mention the countries and cities you’ll visit, and the dates. This helps the officer understand your route.
For example: “I plan to visit France, Spain, and Italy from 10th August to 24th August, spending 5 days in each country.”
🔁 Ask for a multi-entry visa (if applicable)
If your itinerary involves entering and exiting the Schengen area more than once or you plan to travel through border-sharing countries, it’s worth requesting a multi-entry visa. We have received multi-entry visa every time we have requested.
🇮🇳 Mention your ties to India
This is a crucial section of your cover letter. We advise mentioning strong ties to your home country visa job, family, property, or any strong reasons to come back. Avoid sounding desperate.
📎 Highlight the documents you’re submitting
Briefly list the key documents you’ve included, like flight bookings, hotel reservations, travel insurance, ITR, and your employer NOC.
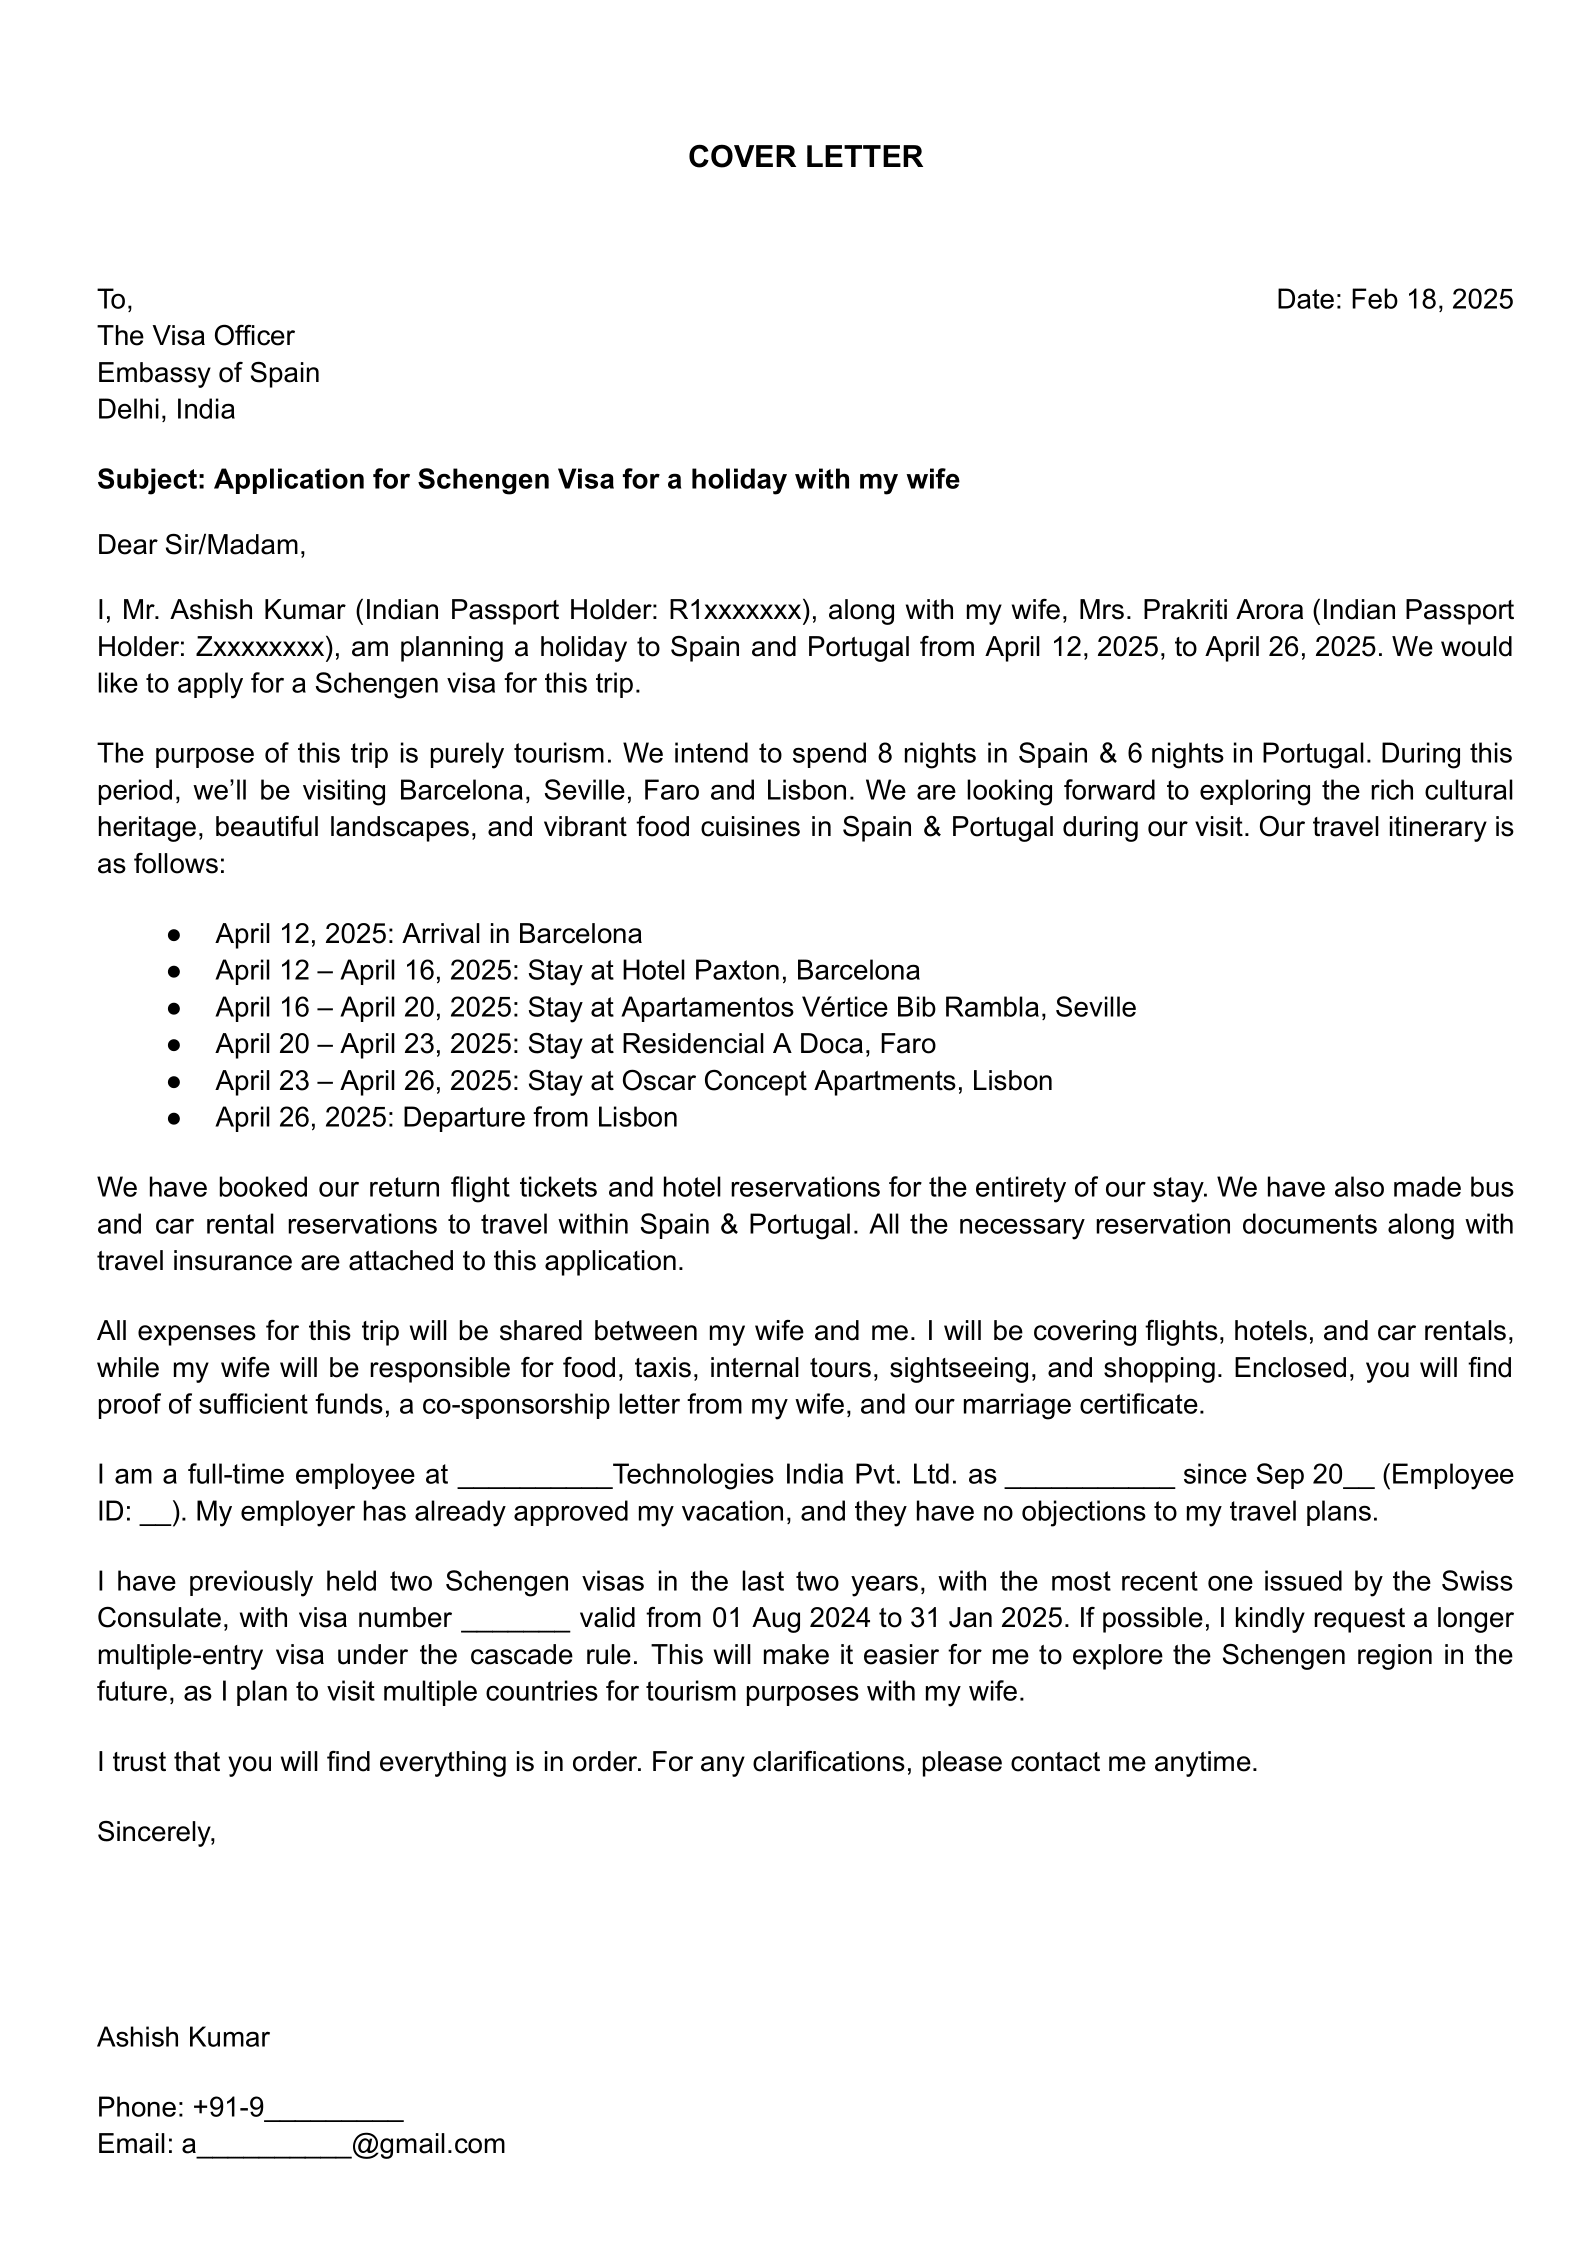
Aim for a one-page cover letter. Keep it to the point, mentioning only the necessary information, and your itinerary overview.
Format of our Cover Letters
Attached below is our sample cover letter that helped us secure a Schengen Visa twice in 9 months:
Supporting Documents
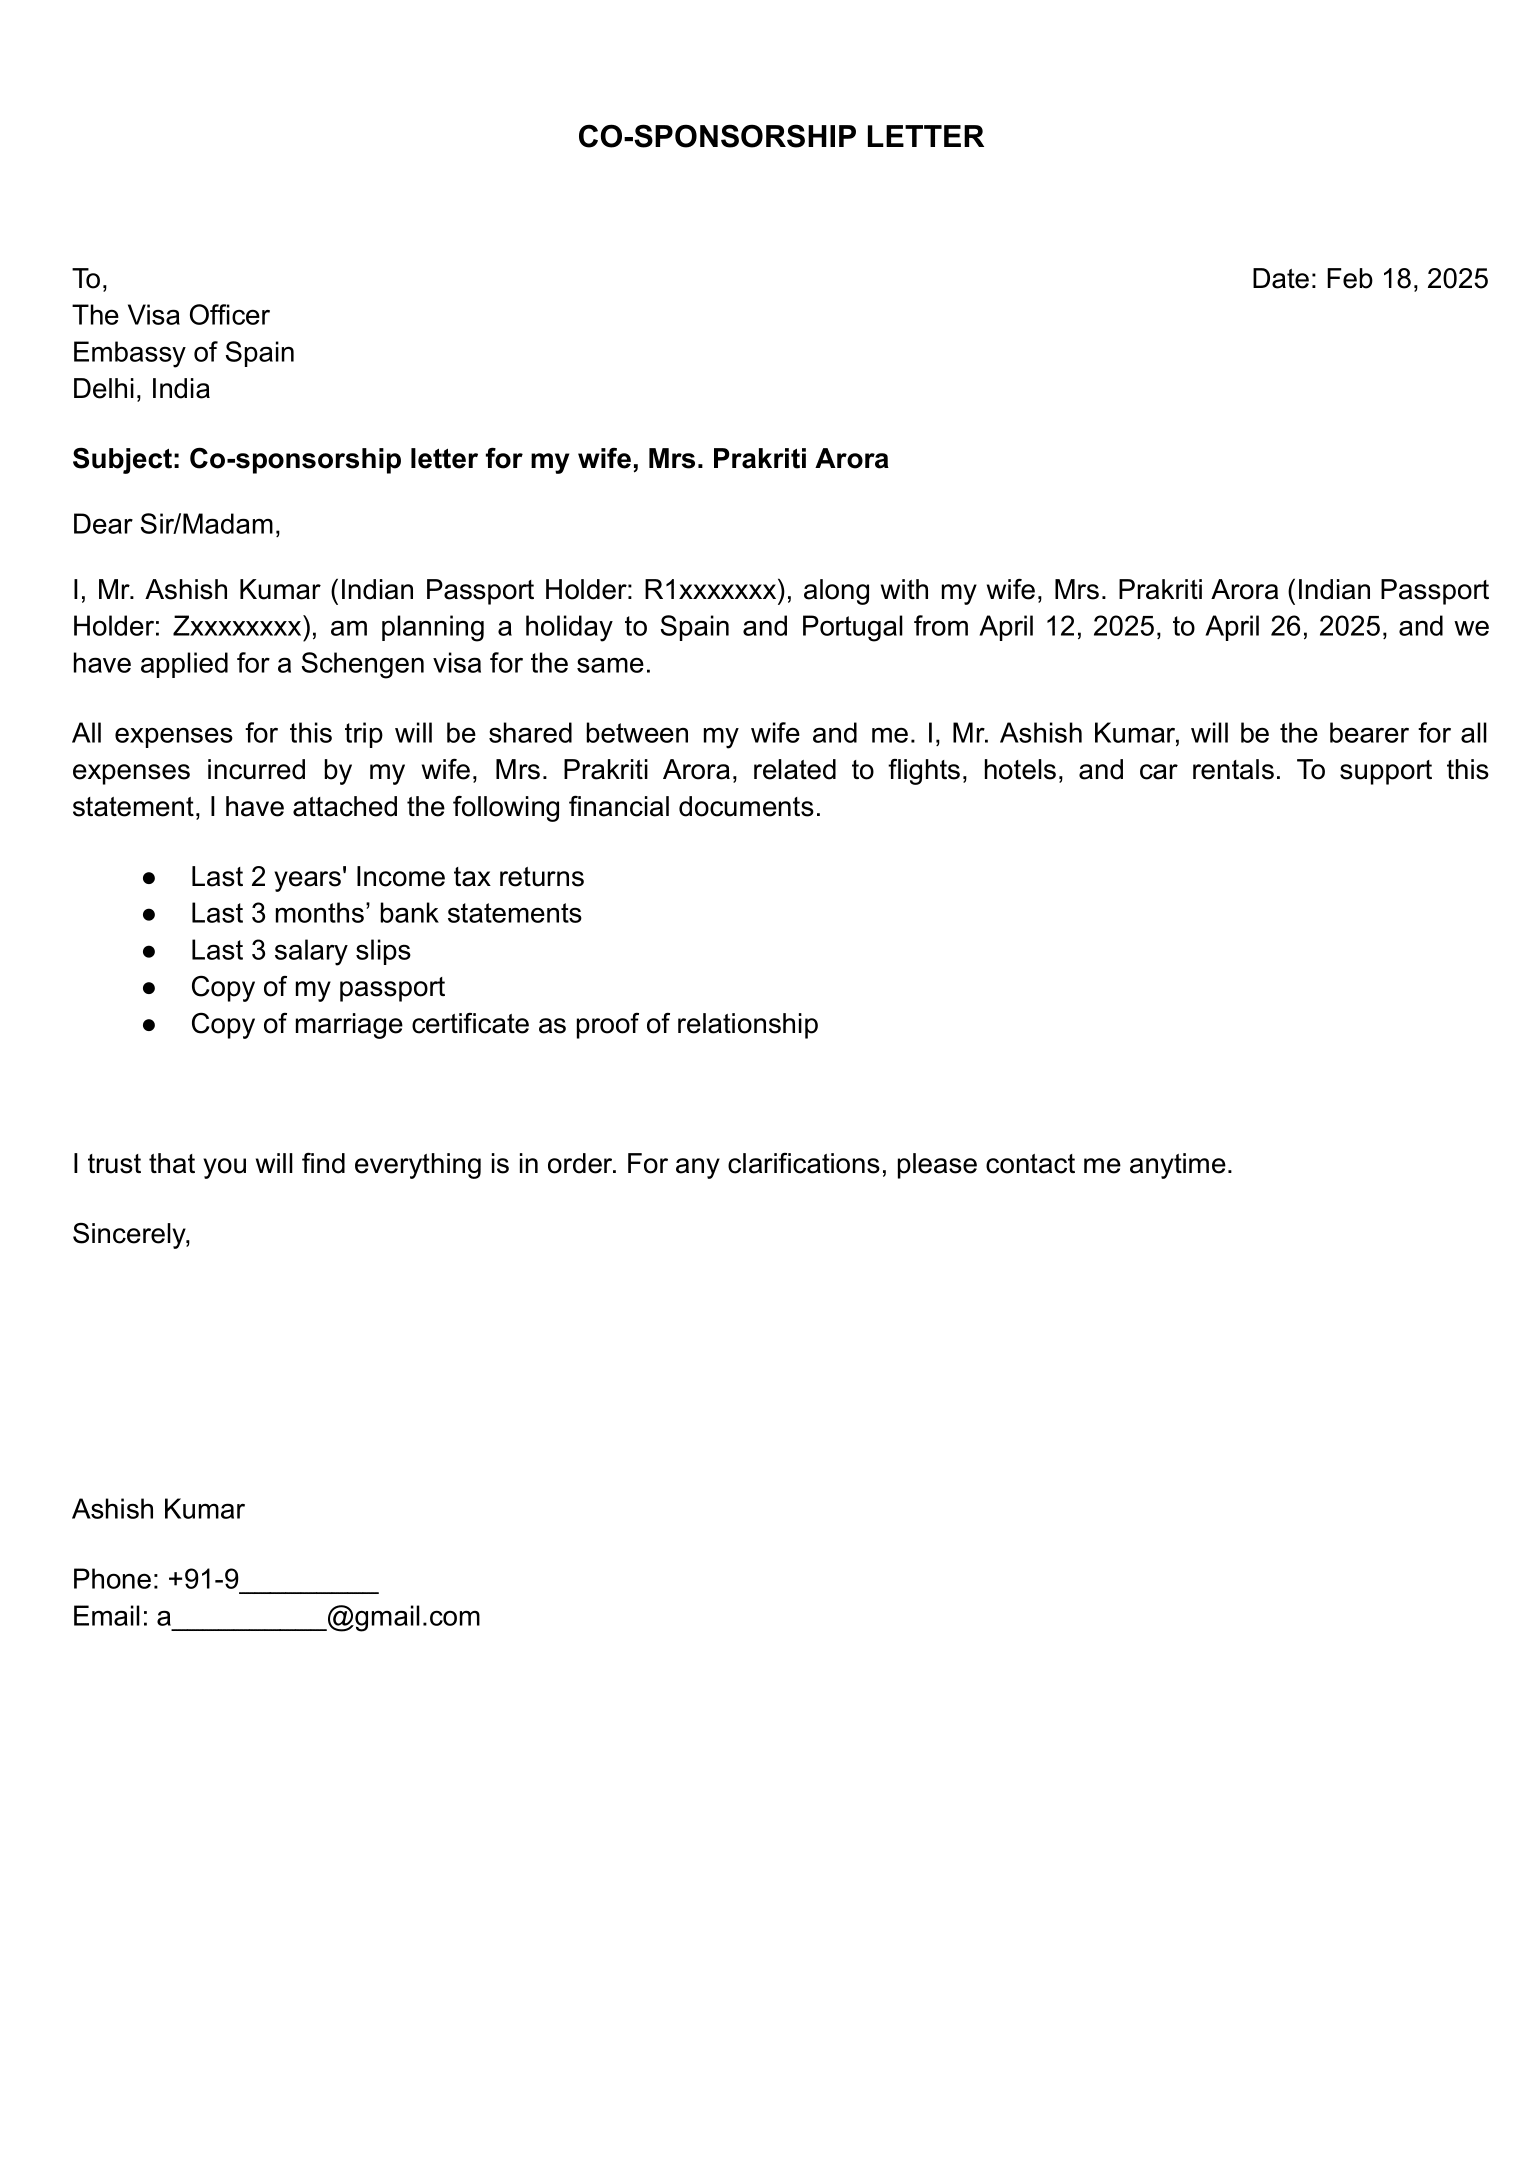
If you’re a student, a non-earning spouse, or someone whose trip is being funded by a parent, sibling, or partner, the most important addition to your application will be a sponsorship letter.
This is a simple, signed declaration from your sponsor confirming that they will be covering your travel expenses, accommodation, and return journey.
Attached below is the sample of our sponsorship letter:
Final Thoughts
We understand applying for a Schengen Visa can feel overwhelming and time consuming, especially the first time. However, with the right preparation and checklist, it doesn’t have to be.
Before you wrap up your application, here are a few easy-to-miss mistakes that we wish we knew when we applied for the first time:
- ❌ Not carrying cash or card to the VFS/BLS centre: They often only accept payments in a specific mode. It’s always safer to carry both.
- ❌ Typos or mismatches in your application form: Ensure your form matches your documents exactly (names, passport numbers, dates).
- ❌ Reaching late for your appointment: VFS is usually strict with timings, and being even 5–10 minutes late might cause unnecessary cancellation.
- ⚠️ Check for additional charges: Both VFS and BLS offer additional SMS/email and courier privileges, please check whether you have signed up for them before making the final payment.
Got more questions or feeling stuck? Drop a comment below and we’ll be happy to answer. ✈️💙
If you found this blog helpful, don’t forget to share it with your friends and family.

See I have an issue with a part of documentation ,have suffered in previous attempt few years back while trying to do it on my own.What if you own a business but don’t have fixed monthly income ,hence not seen in bank statement.How to go about then ?.
Can you guide me please as I am a bit sad to miss out on Schengen visa or Japan.
It’s a bit complicated in my case but me sure you will have some way out for this one for a guaranteed visa.